AWS API Gateway
- Pradeep P
- Oct 7, 2019
- 8 min read
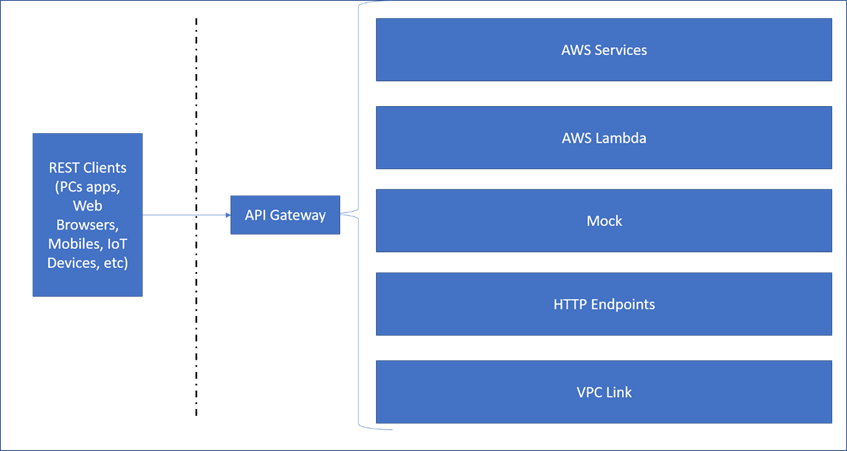
The AWS API Gateway is a service that enables us to create, maintain and monitor APIs in the AWS cloud. API Gateway provides us facilities to create REST and Web socket APIs.
The APIs created with the API Gateway can be powerful. They can be used to access other AWS services, access and trigger Lambda functions, invoke any other HTTP endpoints, etc. In this blog, we shall have a simple introduction to the API Gateway and some of it’s basic features.
We shall investigate how we can create a simple REST API that can be invoked from our PC and get some result out of it.
Pre-requisites for understanding what is happening here:
Basics of AWS
An AWS account
Basic knowledge of REST APIs and tools like Postman
Target:
In this blog, we shall create a simple API that shall return the current time. For this, we shall:
Create a GET REST API
Create a lambda function with Python 3 that returns the current time
Integrate the GET API into the lambda function
Invoke the GET API and see the results displayed in the web browser and also in Postman
Let’s get started:
Open up the AWS console and search for the API gateway service. Navigate into it.
If you don’t have any APIs created in the region, you will see a “Get Started” button. Click on that.
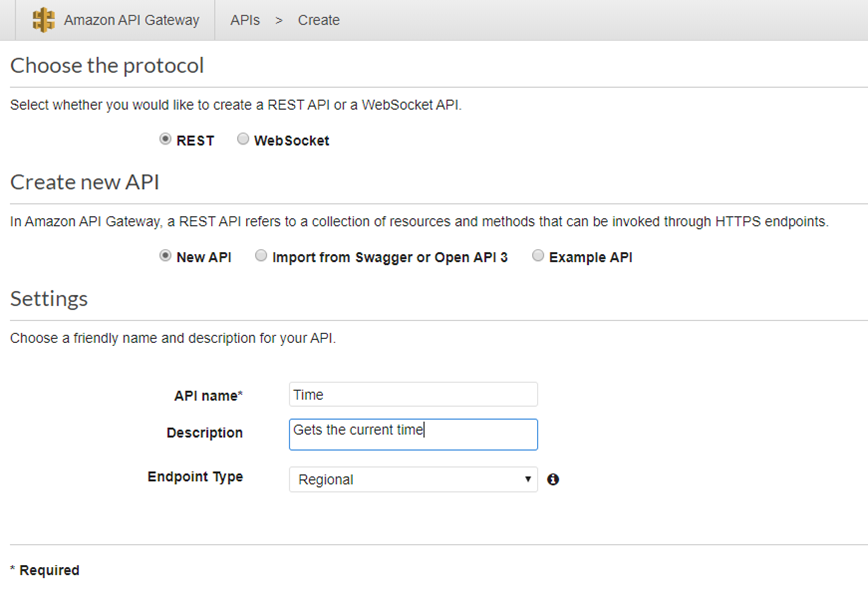
Since we will create a REST API, choose REST. We can import the API from Swagger or create a new API or create a sample API. Lets create a new API.
Provide a name for the API and some basic description and click on Create API.
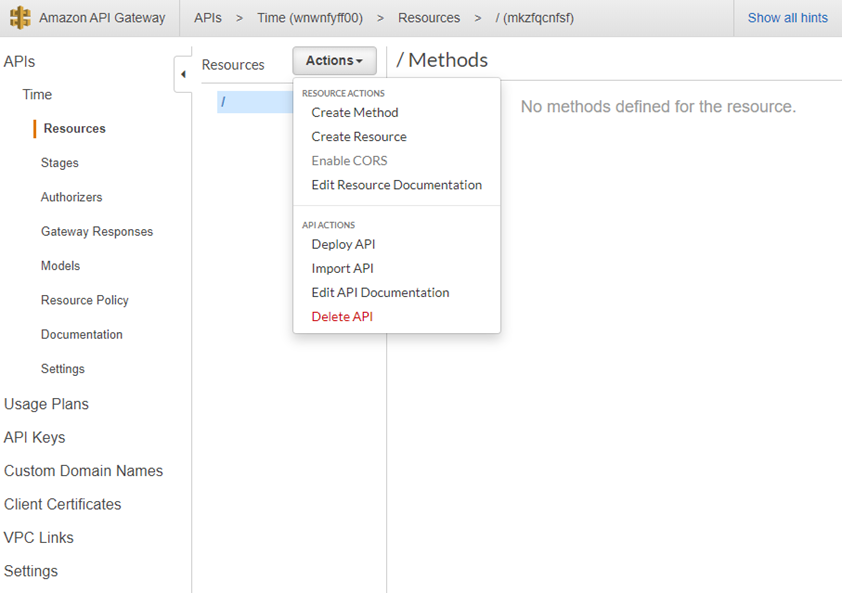
What you now see is sort of the home page for your API. We can do quite a lot of things in here. For now, click on the “Actions” dropdown and click on “Create Method”
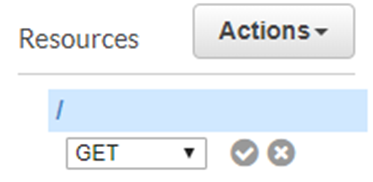
Choose the “GET” option and click on the tick next to it.
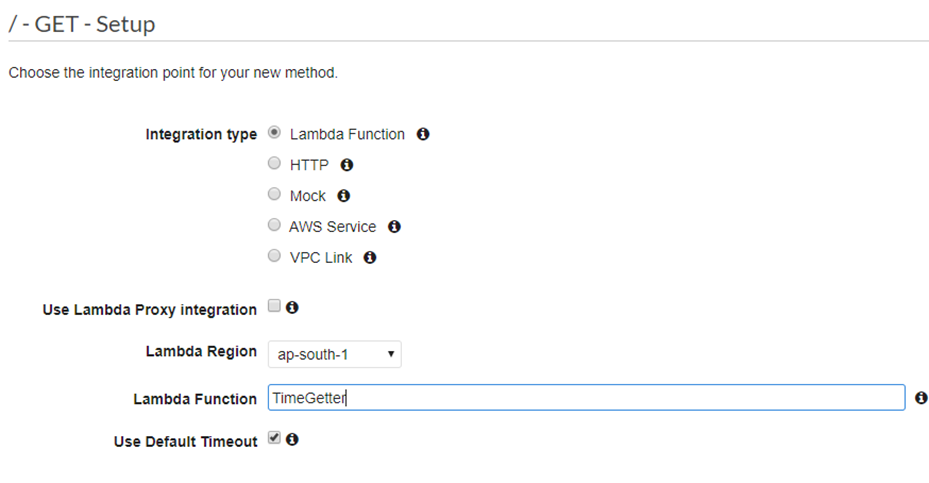
Next, we have to choose what our API will invoke. As discussed earlier, we can have our API call a lambda function or another HTTP endpoint or another AWS Service or a VPC Link or we can even mock the call.
Choose the Lambda function option. I am currently using the ap-south-1 region (i.e., Mumbai, India). You can choose the region closest to you.
Before clicking on “Save”, lets create our Lambda function.
Lambda Function to return current time
In the AWS Services search option, search for Lambda and navigate into the window (in a new tab, preferably). Here, click on the “Create function” and choose “Author from Scratch”.

If in case the text is not visible in the above image, I have set the function name as TimeGetter. I have chosen the run time to be Python 3.6. For the permissions, since we are not going to use any other AWS services, I have selected the option to create a new role with basic Lambda permissions.
Click on the Create Function button now.
In the Python editor, replace the existing code with the following code:
import json
import datetime
def lambda_handler(event, context):
now=datetime.datetime.now()
print(“TimeGetter function returning time: ” + now.isoformat())
return {
‘statusCode’: 200,
‘body’: json.dumps(now.isoformat())
}
Lets test the Lambda function now. Click on the “Test” button at the top to create a simple test event. Name the test event appropriately. The input data doesn’t matter here since we don’t need any inputs to the lambda function. Hence, you can just leave it as is.
Save the test event, save the Lambda function and click on test. You should see the test results in green at the top of the page and you should see the time being printed as well:

Also, in the CloudWatch logs, you should see the output from the Lambda print function listed:

Now that our Lambda function is working, let us go back to the API Gateway and integrate this function.
Integrating the Lambda function
Go back to the API gateway page and refresh it once (to be able to see the new Lambda listed)
Type in the first few letters of the lambda function in the appropriate text box to see the full name in a drop down. Choose it and click on “Save”. A prompt is provided to ask your confirmation about the required permissions. Click OK.
Our API is now created:

Click on the Test option, click on the Test button in the pages that shows up and you will see a sample invocation of our API endpoint. This means that our API is working but it is not yet ready for being used from outside of the AWS environment.

If you copy the URI and open it from within the browser, you will get some errors. This is because the API is not yet deployed. For this, we need to create a deployment.
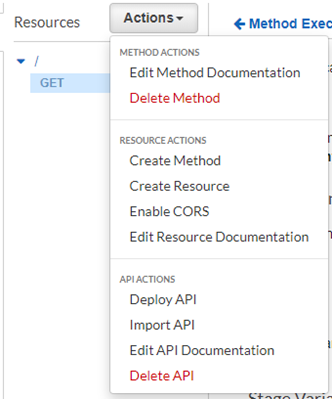
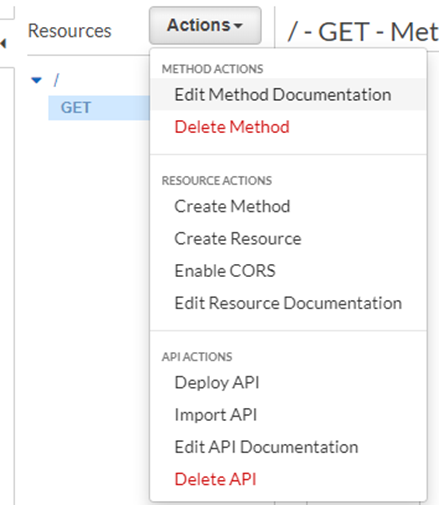
From the Actions menu, click on Deploy API:
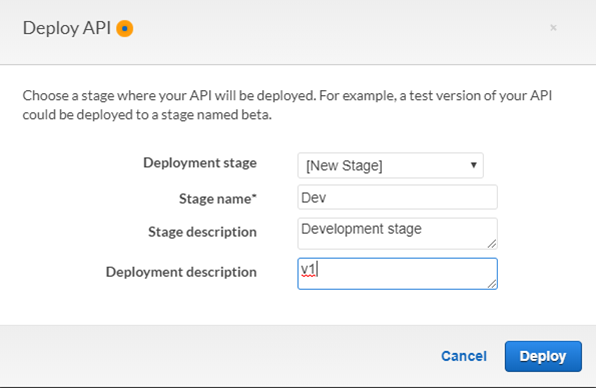
Feed in some values and click on Deploy
We now get a page that lets us control how the API shall be accessed. There are a lot of settings here.
We can set the API throttling limit, which limits the number of calls that our API can service per second.
We can set up Web ACLs (Access Control Lists) that can help us deny certain IPs from accessing our API or set up Web Firewalls or add protection against DDoS attacks.
We can add Client Certificates so that only the client that provides us with this certificate shall be allowed to make the call.
In the logging page, we can enable CloudWatch logs and enable the entire request response to be logged. This is good for a developmental stage since we might find this useful for debugging any issues with the API calls.
We can also create a Canary, which can help us route certain percentage of the traffic to different stages of the API. This is good if we have a new version of the API deployed but want it to be well tested before making it the primary one. Hence, we can create a Canary and initially route some small traffic to it and then later promote it if it is found to be working fine. This is sort of a blue-green deployment scenari.
Once all you have played around with these settings, click on the Save option.
To invoke the API, choose the API URL listed at the top of the page.
From Chrome:

Using Postman:
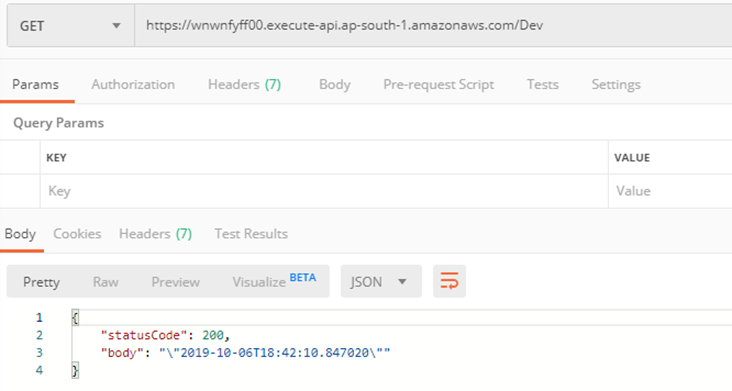
Thus, we can create a simple API using the API Gateway and allow it to run a Lambda function.
Next steps:
Adding a resource path to the API
Currently, our API URI looks like this:
If we want to add a resource path to the URI, to distinguish it from another API we are providing, we can do so easily. A simple example is I want to return time in one API and date in one API. I can do so by creating a Resource:
In the Resources menu, click on the Actions drop down and select the “Create Resource”

Now, this creates a Child Resource called “date”. For this, we can add methods like GET, POST, etc. as before and associate this with lambdas, etc.
Thus, if we now navigate using the URL https://wnwnfyff00.execute-api.ap-south-1.amazonaws.com/Dev/date, it will invoke the action associated with the child resource.
Integration Response
Let us assume that we want to get our content back to the client in a specific format (like html) or remove some unnecessary content out of the output generated from the lambda. We can either edit the lambda to change its output or we can use something called the Integration Response. Instead of changing the lambda function, we can just parse the output from it and adapt it to create a customized output. Consider that you have a lambda function that returns the contents of a DynamoDB in JSON format. This lambda might be getting used in multiple locations and hence, it is not easy to modify its output. What we can do is create a new API that can parse the JSON, convert it to HTML or XML or any other format and return it. We can play around with this to get our desired output. The Integration Response block in the API provides an option to set a mapping template. This is where we can map the output from the lambda to the output that we want to return to the user.
Click on the Integration Response block in the Resources section of the API and click on the arrow to display more option:

The template body is written in something called Velocity Template Language (VTL) (http://velocity.apache.org/engine/devel/vtl-reference.html)
In our case, let us just convert the return from a simple JSON into a HTML.
Copy paste the below:
#set($inputRoot = $input.path(‘$’))
<!doctype html>
<html lang=”en”>
<head>
<title>Current time</title>
</head>
<body>
<h1>$inputRoot.body</h1>
</body>
</html>
What we are doing here is printing the body into the output as a HTML Header 1 and the status code as the HTML Title.

Ensure to change the content-type to text/html if you want the browser to render the output as a HTML.
Next, in the Method Response, change the Content-type to text/html as well.
Save the mapping template changes, save the Integration response and then deploy the changes (you will not see the update till you deploy these changes).

Now, run the API URL in a web browser and you can see the results:

Caching the API Responses
Assume that we are getting a lot of hits on to our APIs and each call is actually doing some repetitive operation. For e.g., we are a big e commerce company and we are selling the latest iPhone. Our API that returns the price of the latest iPhone is being called thousands of times each second and each time, our lambda is having to go into the DB and get the results for us. Even though the output doesn’t vary, the entire operation is being repeated. Instead of this, we can enable the API caching. This lets the API gateway store the output for a specific API call for a specified amount of time. Then, the next time it receives the same API call, it just returns the value from the cache instead of performing the entire operation again.
API Caching is not free. We can select the amount of cache the API shall have (between 0.5GB and 237GB). We also set how the TTL (Time To Live) for the cached data.
The Client can also ask for fresh data instead of a cached data by specifying the cache-control header in the request:
Cache-Control: max-age=0
We can also specify that only Authorized users can perform this operation.

Logging the API calls
We can the API calls into CloudWatch. This shall help us debug the API flow and any errors that might arise. There is an option to log the Request Response of the API but only enable this if it doesn’t expose sensitive content.
To enable the API gateway to log into the Cloudwatch, we need to create a role for API Gateway that allows it to write into Cloudwatch. Create this role from the IAM, copy it’s ARN and paste this in the CloudWatch log role ARN
option in the “Settings” section. Once done, go back to the deployment stage and enable the logs. Now, any calls to the API will log the info into the Cloudwatch logs.
We can also enable X-Ray on the API to be able to see the various calls and hops that happen with our API and the response time at each stage.
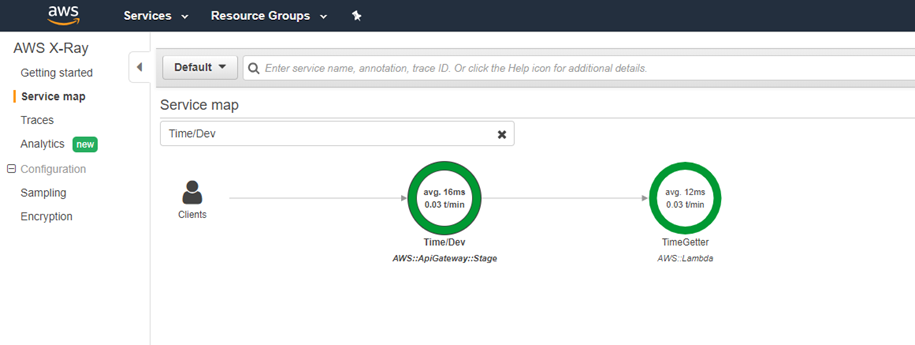
Enable X-Ray to gain a lot of insights into the working of the API.
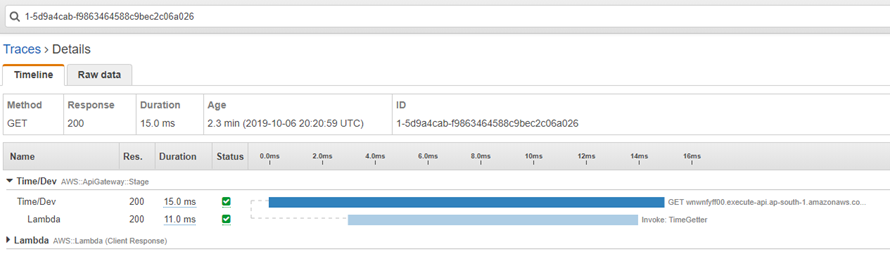
We can use the Traces option here to see the duration of each API call that happened and how much time the inner invocations took:
API Security
API gateway allows us to provide an Authorization and Authentication mechanism for the APIs we create. It has three options:
IAM -> Useful for providing access to users within the same AWS account
Lambda Authorizer (AKA Custom Authorizer) -> Client is expected to pass a token in some pre-determined form, which is passed to a custom lambda function. We implement this lambda function to validate the token and if the token is found to be valid, we return an IAM policy which will indicate whether the client has the permission to use this API or not
Cognito User pools -> The client gets a token from the Cognito User pool and sends this with the API request. We validate this token with the Cognito and then either allow or deny the client the permission to run the API
I hope this blog was useful
Kommentare